In this guide, I will show you how to mod your OSSC to allow additional options and improvements. This guide is intended for OSSC version 1.7 and earlier. The newer OSSC revisions (1.8) do not need the mod as the board revision already has the improvements baked in.
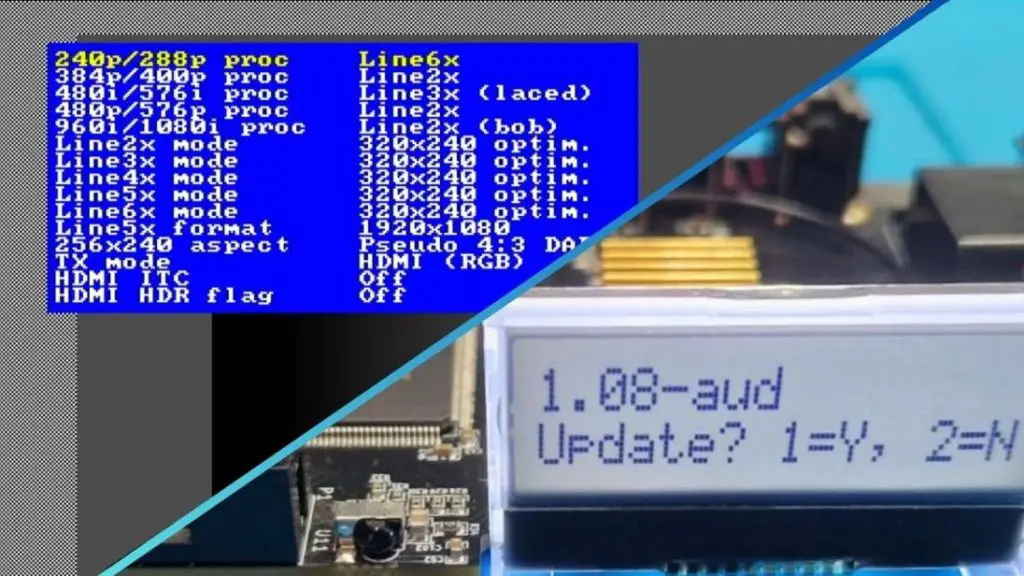
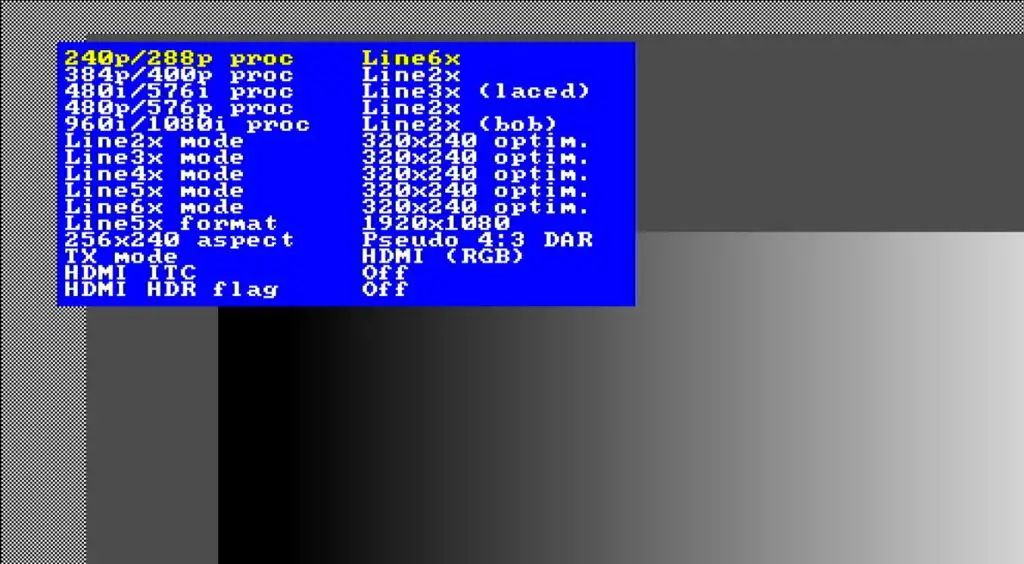
The mod along with the OSSC’s latest firmware offers some great new features like a 6X line mode, meaning you can convert your 240p signals to a nice-looking 1440p. This looks great in my testing a very welcome feature.
There’s now an added HDR mode that will improve brightness if your TV or display supports it. This is great for some of the older consoles that seem to be a little on the darker side and my GameCube and Mega Drive are certainly benefiting from this feature. You may need to adjust your colour and Gamma settings to dial in your perfect image as HDR will affect both.
Shadow mask filters have now been added and they look pretty good. There’s even a pretty good PVM style filter although you’ll need to have your output set the higher line multipliers to get the best-looking image out of them.
And finally, Sync handling has been greatly improved. This is great for arcade board enthusiasts or for retro PCs that like to throw out oddball signals.
Modding steps
The modification itself is fairly straightforward and you should be able to successfully perform it without a microscope, although if your eyesight has ‘seen’ better days, one might come in handy.
I’m performing the mod on OSSC 1.6, this is the sandwich-style design. The 1.7 version has that much nicer injection moulded case which is simply held together by 4 x Phillips head screws.
Opening the 1.6 is a little more complicated due to the different screws used. You want to start off with a Phillips head (PH2) and remove the four screws around the perimeter of the OSSC’s top plate.
You’ll now be able to remove the top plate along with the plastic standoffs underneath. Keep track of these as there are more which differ in size.
Next, we need to remove the hexagonal nut from the toggle switch and the washer underneath. I used a small pair of pliers I had laying around. This will allow you to remove this layer.
The bottom of the OSSC has an additional 4 smaller screws to remove, be careful as there are nuts in-between that have a habit of rolling across the table and onto the floor. An additional 4 stand-offs also fall out after removing the screws along with the bottom plate.
It’s good practice to keep your nuts and bolts in a rough order.
Modding the OSSC
Now we have our PCB free, we can make the modifications. I gave mine a light dusting before starting as the years haven’t been kind to my poor OSSC.
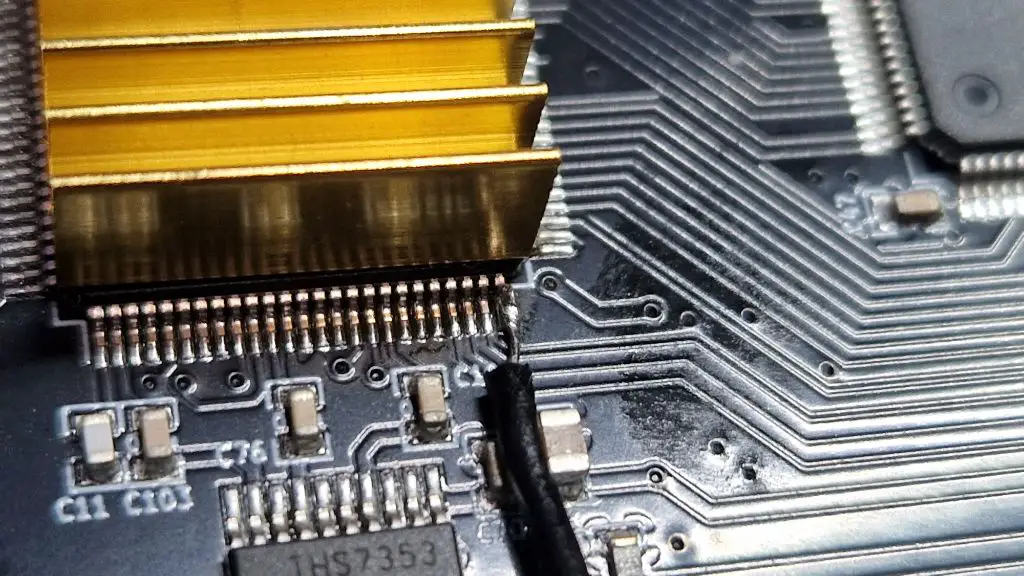
We are going to be removing a resistor and soldering a wire from the bottom pad to a pin on the video IC.
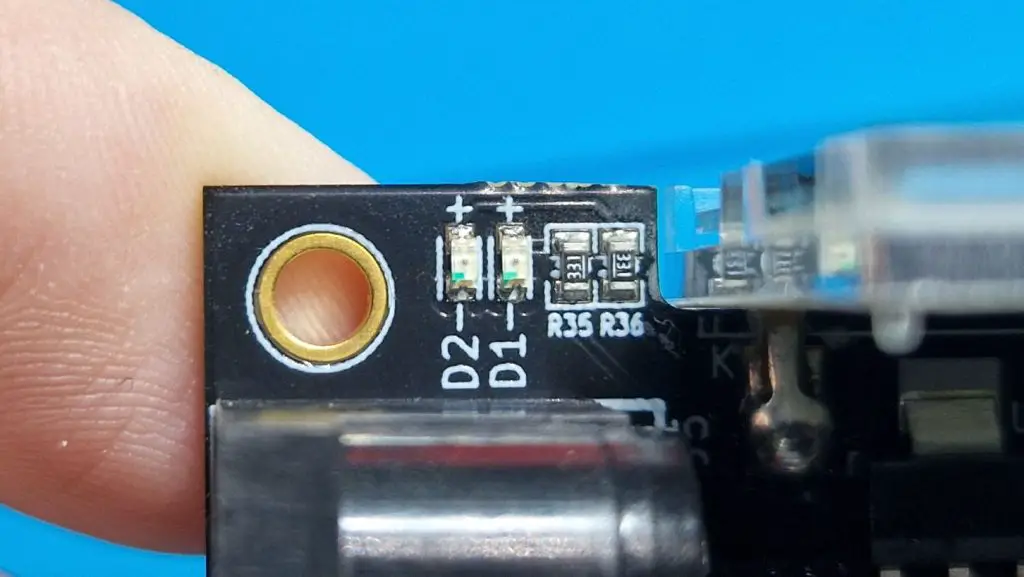
First, locate the resistor, it’s labelled R35 and is just above the barrel jack and the left of the LCD display.
Desolder R35, I used a KU solder tip to heat both sides quickly and it slid right off, I would advise against using hot air as the display and barrel jack are a little too close for my liking!
With R35 removed, we must run a wire from the bottom pad to pin 25 of the TVP7002 (labelled U1). This is the furthest to the right, just about where C100 is. This pin needs to be soldered to and not lifted.
Add a little flux and come in with your iron from the right, this will avoid bridging.
Add a little flux to the bottom pad of where R35 was and solder the other end of the wire to the pad as show in the picture below.
And that’s it, you are done! If you want to make certain you have a good connection you can always use a multimeter to check for continuity between the pad and the pin.
I would highly recommend testing your OSSC before putting it back together just in case you need to adjust your wire.
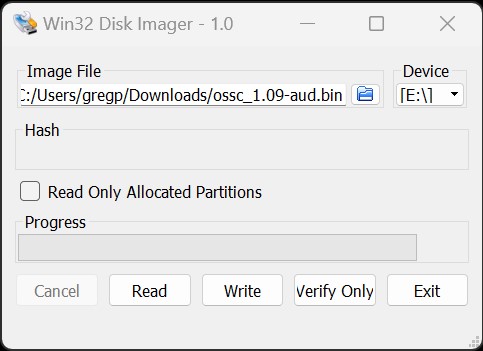
To use the latest features, you need to flash the newest firmware. You can pick up the latest firmware here. The latest firmware at the time of writing is 1.09-aud.
Download the newest firmware and use a program to flash this to your OSSC’s MicroSD card. I used WIN32 Disk imager, but there are plenty of other options such as Balena Etcher.
Select your drive and flash the file.
Reinsert your MicroSD card into the OSSC, power it on and navigate to the Settings options then find the Fw. Update option. Press ok and the update files will be validated.
Press 1 to install the new firmware to the OSSC and within a few seconds the update will flash and you’ll be prompted to turn off your OSSC.
Turn the OSSC back on and you’ll now have access to all the new features.
Congratulations, all that’s left is to put your OSSC shell back together which is as simple as following the steps above in reverse.